Measuring THD in amplifiers.
Last edit in 2016.
This page contains :- Description of gear used for THD
measurement. How to use the gear.
Fig 1. Sheet 1, Block diagram of THD measurement of amplifier,
Fig 2. Sheet 2, Oscillator, 1kHz Wien Bridge, 0.004% THD,
Fig 3. Sheet 3, attenuator and buffer and filter after 1kHz
oscillator,
Fig 4. Sheet 4, L&C Bridged T notch filter for nulling 1kHz,
THD amp and filters.
Fig 5. Sheet 5, Hi Zin buffer for use with hi Z source to be
tested.
Fig 6. Sheet 6, THD Measuring unit front panel.
Using
the test gear.
IMD measurement.
Fig 7. Wave forms for IMD tests.
Fig 8. Test gear set up for IMD.
------------------------------------------------------------------------------
How do we measure THD in amplifiers?
Over many years I have evolved my own design of analog
schematics for a low THD oscillator and THD
detector, shown in Fig 1 to Fig 6, Schematic Sheets 1 to 6. You
may find these useful if you have a few
spare weeks to build a good measurement tool.
The power supply is not shown. The transformer with Si diodes
and first reservoir capacitors were
mounted in a steel sheet cubic box with side dimension = 130mm.
You may have a different spare
transformer than I used. Mine is 10VA transformer with 250Vrms
mains input and 12V-0-12V secondary.
The PSU box was screwed to the shelf unit for test gear and
700mm away from the box for the instrument.
This box has a 1mm steel sheet bottom which is turned up on
front to make a steel front panel 130mm
high and also turned up on 3 other sides 16mm. A 16mm MDF board
is screwed to steel sheet bottom to
allow my DIY boards to be screwed to the board. The top of the
box is 10mm plywood, with lining of
Al-foil glued on with silicone so when the box top is screwed to
base there is total electrostatic shielding
of all internals. There is no complete magnetic shielding
because it would affect the bridged T LC notch
filter too much. The coil involved is prone to stray magnetic
fields so equipment nearby with mains
transformers should be turned off, and the amp being
tested or anything else likely to cause interference
be located at least 700mm away from the instrument.
All Vdc voltage rails must be capable of 30mAdc at least and be
regulated. The required rails are +22Vdc,
-22Vdc, +16vdc, -16Vdc. Wires from rails to boards should be
twisted pairs from + and - electrolytic cap
rails, and at each board there is additional RC filtering with
at least 150r + 2,200 uF to prevent cross talk
between different sections of the instrument. In addition to the
electro caps, 2uF caps are placed close to
op-amps as possible and between rail entry and a nearby 0V rail.
The 0V rail for the instrument is a short
100mm Cu wire behind the front panel and it is connected to the
chassis and metal shield of casing via 270r
bypassed with 1uF. I found there was negligible hum noise entry
via capacitance between power transformer
primary winding and the secondary winding.
Keener constructors would arrange the PSU so that it acts to
charge up batteries while the unit is turned off,
and when the unit is switched on, AC power and 0V rail is
entirely disconnected so that the 0V rail can float
freely and the unit used to measure differential Vac between two
signal points each with a common signal.
I've managed to never need to do this for THD measurements, but
where there was a balanced output from
an amp it could be useful. The instrument does not have its case
connected to the mains Earth because of
risk of noise entry, but while used, the 0V coaxial RCA cables
used for tests will refer the test signal 0V
rail the 0V rail of amp. Vigilance is needed to ensure that
there is adequate grounding which ever way any
gear is to be tested. Despite theoretical correct practice,
there can always be noise in voltage samples used
for THD and other measurements. Basic diagram of gear used for
THD :-
Fig 1. Block diagram for testing THD of amplifier.
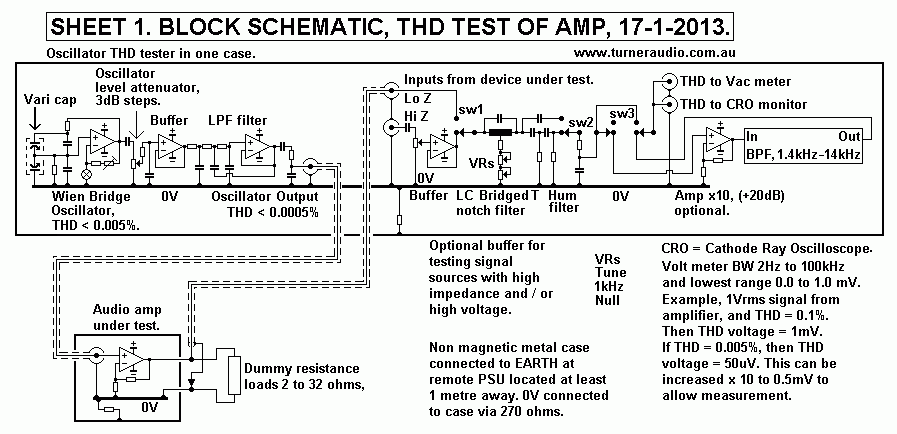
Fig 2. Details of the 1kHz oscillator :- >
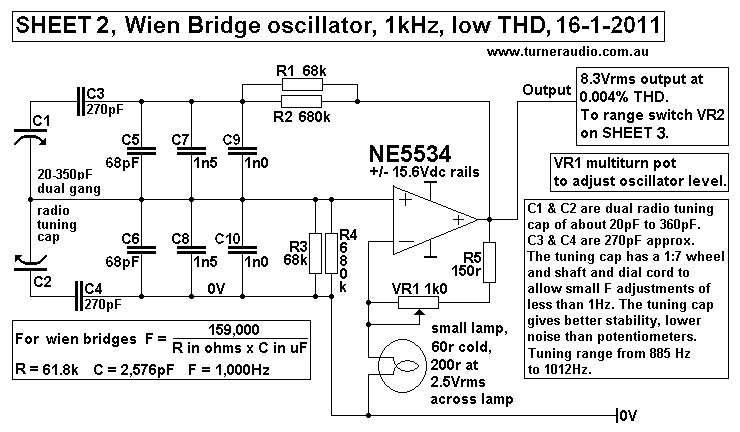
Fig 3. Details of the attenuator, buffer and filter
following the 1kHz oscillator :- 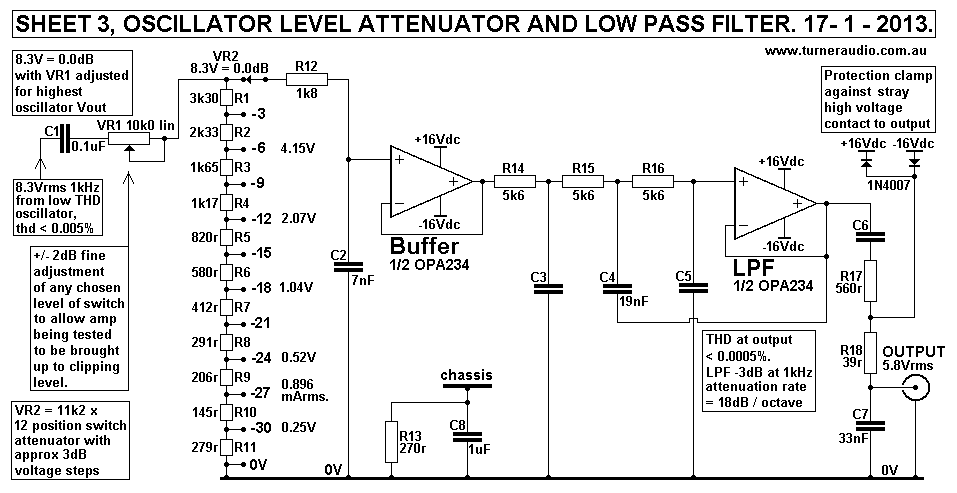
The buffer and filter keeps the input of any device under test
well separated from the oscillator.
C1 and VR1 and VR2 form a simple 6dB/octave HPF with pole =
160Hz, thus reducing hum from
oscillator. The following LPF has R12&C2 slightly variable
pole for about 20kHz at 0.0dB.
The LPF with R&C between the op-amps gives -3dB at 1.0kHz
and then -18dB/octave attenuation
so that oscillator THD is reduced to 0.0005%. I had tried to use
air cored L and C for a NFB path
for attenuation of harmonics in oscillator signal but I found
the stray magnetic coupling between
the bridged T LC notch filter and LC filter could not be reduced
to negligible levels and best LPF
is the one above.
Fig 4. Bridged T notch filter and bandpass filter.
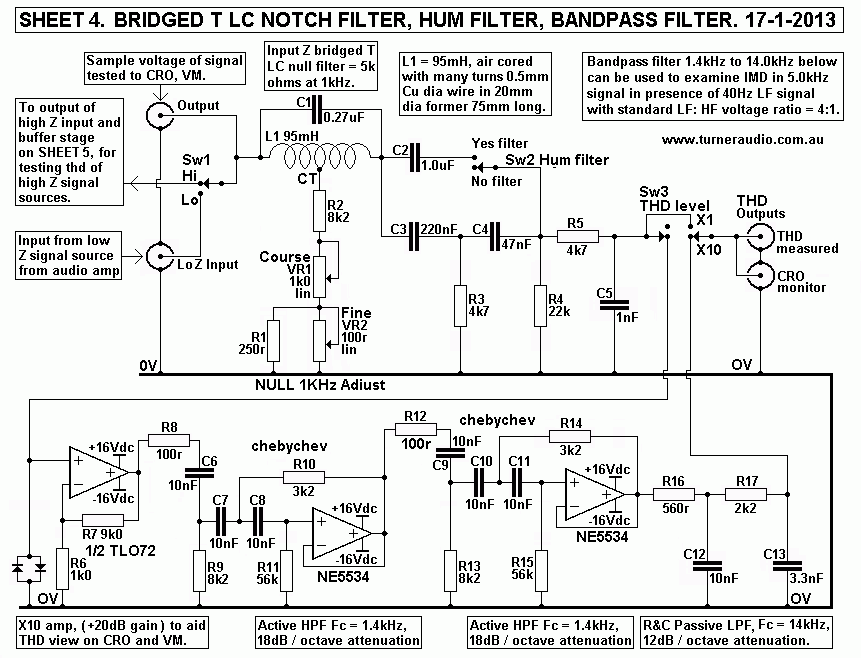
The above shows the air cored inductance with CT used for the
bridged T notch filter to reduce
the 1kHz signal in sample tested signal to about -100dB. Sample
signal from an amp may be up
to 100Vrms and LC filter Rin = 5k0, so the filter has little
loading effect on amplifier outputs.
A high impedance buffer input is shown in Sheet 5 below so that
higher impedance anode circuits
may be tested with minimal loading. For high level sample
signals, THD is usually easily viewed
and measured using an oscilloscope and millivolt meter without
any following amp or filtering to
make the THD more easily viewed in an oscilloscope if the THD is
at a very low level.
For testing low level signal from any amp, say 1Vrms, the X10
amp above amplifies the recovered
THD and filters unwanted signal and noise below 1.4kHz and above
14kHz, so that it becomes
much easier to view and measure harmonics between 2kHz and
12kHz. The Hi Zin buffer :-
Fig 5. Attenuator, buffer, THD measurement, high Z
sources.
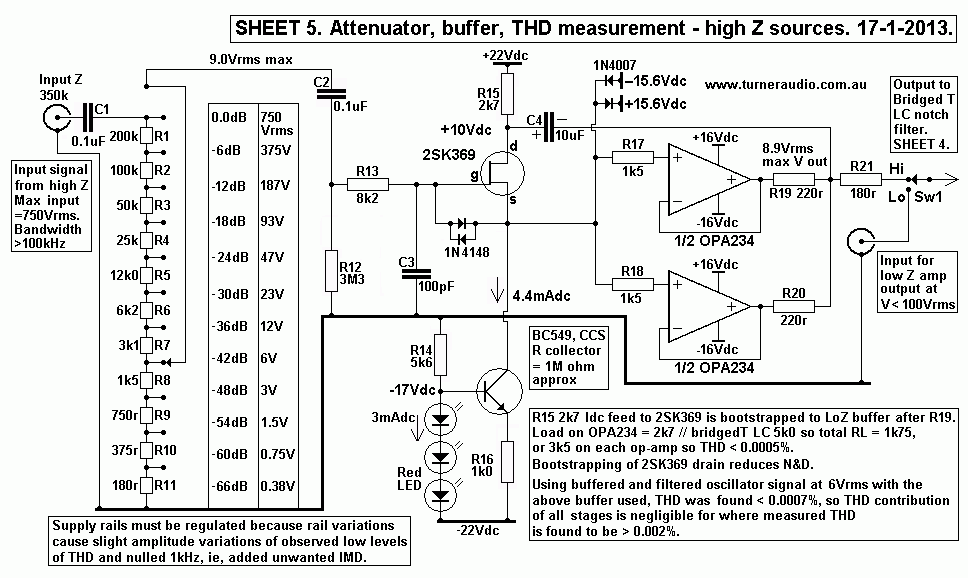
The buffer has 2 x HPF with C1 and input R of VR = 400k approx,
and C2 and R12, giving a
pole at about 4Hz. LPF with R13 and C3 give a variable pole to
keep out RF. R13 also offers some
series R to avoid excessive input current to 2SK369 gate and
1N4148 and 1N4007 act to clamp
gate voltage to less than +/- 17Vpk. So some protection exists
for the delicate but low noise j-fet,
2SK369, and its active CCS with a BC559. Distortion of this
buffer stage was found to be negligible,
and the j-fet drain supply voltage is bootstrapped to op-amp
output. Layout and size of the unit of
the front panel is flexible, and you may think of a better way
that I have. Internal Box dimensions
= 310mm wide, 340mm front to back, and 125mm high. Box material
= sheet steel bottom and front
panel. Sides, top and rear = 10mm ply lined with AL foil,
grounded to steel bottom.
Fig 6. Layout of the front panel controls, sockets and
switches :-
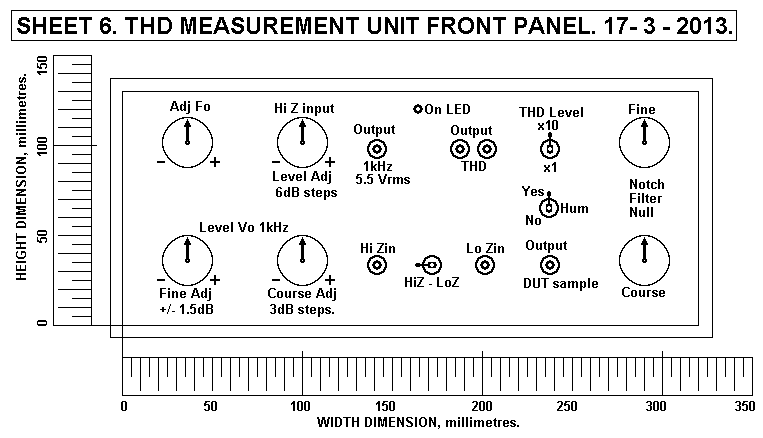
HOW TO USE THE
THD MEASURING UNIT. Turn on unit at mains.
1. Adjust Fo to center position for very close to 1.0kHz.
2. Adjust fine Vo level at center position. Adjust Course Vo
level at minimum.
3. Adjust Hi Zin Level to minimum.
If measuring audio amp output meant for 8 ohm load, connect RCA
lead red active lead end with
alligator clip to active load voltage. Connect black 0V coax
lead clip to 0V terminal of amp near
input RCA socket.
4. Turn HiZ-LoZ switch towards Lo Zin RCA socket, plug in RCA
lead from amp load.
5. Connect RCA lead from DUT ( Device Under Test ) sample to
CRO.
6. Connect RCA lead from Output THD RCA socket to CRO.
7. Connect RCA lead from Output THD RCA socket to Vac voltmeter
capable of measuring 2Hz
to 500kHz, and at least 0-1mV range to 0-10V range.
8. Clip an additional Vac meter across amp load to measure load
output voltage, at least up to 1kHz.
9. Raise Course Level of Vo Oscillator signal until amp just
goes over clip level.
10. Adjust Fine Level of Vo so amp Vo is just under clipping
seen on CRO, ie, no flats on sine wave.
11. Adjust CRO Level and Vac meter level to view and measure THD
output. It will seem to be a high
voltage near the amp sample voltage level.
12. Adjust Course Notch Filter Null knob in either direction to
reduce THD levels seen. This should reduce
viewed voltages by at least -20dB.
13. Try adjusting both Course and Fine to achieve a deep as
possible null of the large signal present which
will be 1kHz. You will need to adjust CRO and VM ranges to view
and measure THD as nulling of
1 kHz continues. As 1kHz is reduced, you may see the wave form
become distorted and see a hum
signal appear as the 1kHz is removed, but leaving behind the amp
distortion and hum or other noise.
14. Adjust the Oscillator Fine Fo adjust knob and Notch Filter
knobs to achieve the lowest possible value
of 1kHz present. At this time, hum levels from power supply
artifacts may be greater than THD and
thus invalidate the THD measurement.
15. Turn the Hum switch to No, and you should see any signals
below 300Hz be largely reduced.
Let us suppose you have amp load voltage at just under clipping
= 15.0Vrms. Let us also suppose that
this isn't a high enough voltage to overload any meter or CRO
input and give a false reading.
The DUT sample voltage when LoZ input is used will be the same
as the load voltage.
But where the amp makes say 50Vrms, it will be better to use the
Hi Z input, and turn down the
level of input to a lower convenient voltage, say -12dB, ie,
12.5Vrms. The reduced level of 12.5Vrms
becomes the DUT sample signal. Let us suppose the measured and
viewed THD has had the 1kHz
nulled maximally. Where this is seen on the CRO, you should also
achieve a minimum THD
measurement on the VM. There may still be HF noise in the form
of pulses at a rate of 100Hz
caused by PSU diode noise entering the amp signal path
somewhere. The VM will tell you an
incorrect reading for THD if the pulses are above the THD level.
With the CRO set for most sensitive
position, say 0-10mV, you can calibrate the voltages below 10mV
on a piece of masking tape beside
the CRO screen, and even with pulses or noise the levels
of THD can be read off within the noise.
Don't always rely on what meters say because the CRO gives you a
visual picture that you far more
than the meter. Let us suppose you have measured the THD at
0.1Vrms. It will most commonly appear
as a ragged wave form that appears to have perhaps several
frequencies present, usually dominated by
2H and 3H with others more difficult to estimate.
To measure levels of each harmonic requires the use of an
additional filter unit not in this web-page.
But the total of all harmonics is deemed to be 0.1Vrms. The THD
percentage is calculated as Dn% =
100% x THD Vrms / DUT Sample Vrms. In this case, Dn% = 100 x
0.1V / 15.0V = 0.66%. This may
be a very good reading for a PP triode amp before any other loop
NFB is applied.
Just measuring THD at just under clipping does not tell us what
we should want to know about the amp.
We should want to know what THD levels are below clipping. We
have so far set up the amp with a signal
input that produces a level just under clipping. This is the
0.0dB REFERENCE LEVEL.
Adjust the 1kHz oscillator Level switch down one click and
output level should be 0.7 x 15Vrms at the
onset of 0.0dB clipping level. So Vsample may be 10.5Vrms.
Adjust all 3 nulling knobs for lowest
THD and RECORD YOUR MEASUREMENT IN AN EXERCISE BOOK. Adjust the
1kHz down
another click for -6dB and Vsample should be 7.5Vrms. Re-adjust
for deepest null, measure and
record it. Continue down to say 3Vrms and you may find its
difficult to see the THD on the CRO
or measure it. So turn the switch to THD x 10, and this
amplifies the THD to read easier on CRO,
and measure, BUT YOU NEED TO DIVIDE ALL MEASURED THD BY 10. Most
class A tube
amps have THD % levels that decrease from 0.0dB in proportion to
output load voltages.
So if you measure 0.66% at 15Vrms, then at 1.5Vrms, you may find
THD = 0.066%. This means
the actual voltage of the THD = 0.99mVrms, a rather small
voltage. If 20dB of global NFB is also used
with the amp mentioned here, THD at 1.5Vrms output may be
0.0066%, and THD voltage = 0.1mV, and
THIS IS DIFFICULT for the average man to measure properly,
unless he has exceedingly good
measurement equipment.
Most very good power amplifiers have noise levels < 0.25mV
under following conditions :-
No signal input present, Input terminal shorted to 0V rail.
Preamps should have lower levels of noise at
output under the same condition. Noise is unavoidable in all
amplifiers, but can always be minimized
by careful choice of devices, choice of their operating
conditions, and resistance values, especially at
input stages of the amp. Noise originating from power supplies
must always be eliminated with careful
design, component placement, positioning, and earthing routes.
Noise should not increase beyond the
low noise measured at the idle condition. Noise from a power amp
may be expected to measure 0.25mV,
and when viewed on the CRO, it looks like AM radio signals, plus
some mains F and harmonics plus
diode switching noise. 0.25mV of noise is inaudible with average
sensitivity speakers, but often would
be audible with headphones.
Thus headphone outlets on power amps often have a resistance
divider to reduce the 8r0 levels by
say at least -15dB, say 22r0 10W + 4r7 5W. Often the 6.3mm
headphone jack has switches on the jack
which disconnect speakers from amp and connect R divider when
phone jack is pushed in.
This means the the amp noise of 0.25mV at speaker terminals is
reduced to 0.44mV, and usually this
is quiet enough. 22r + 2r2 also works fine. The signal levels at
amplifier will be up to 12 times higher
than at headphones, but still be well below amp clipping amp
levels.
The R divider loads the amp with about 27r and the amp THD is
often less than 1/2 what it is for 8r0
speaker load. Therefore headphone use usually gives the purest
sound with lowest amp THD possible.
The R divider Rout with 27r0 + 4r7 = 3r8, and headphones with
typical Z of 32r0 are being driven with
a resistance low enough for good damping factor.
The use of an exercise book allows the recorded THD figures to
be used to draw a graph of Vo versus
THD%. I often prepare THD graphs for loads 2, 3, 4, 5, 6 , 7, 8,
10, 12, 14, 16 24, 32 ohms.
Making all measurements and graphs for each load is a lot of
work, but only then does it become clear
what are the effects of various loads on THD. One should
conclude that it is always wise to never use a
load value that is lower than the nominal load value specified
for the amp.
The higher the THD, the higher the Intermodulation Products will
be. Suppose you have a class A tube
amp with bandwidth at near clipping 0.0dB level from say 14Hz to
65kHz, without any global NFB,
and with THD = 3%, and using RL = 70% of the nominal speaker
load value, and the maximum power
level of the amp is more than 15 times the maximum average power
you need. If you apply say say 20dB
GNFB, then it usually sounds very well.
Bandwidth with GNFB is increased with GNFB and stability may be
threatened so it is always wise to
tailor the phase shift and gain of the input stages so that
additional BW in excess of 7Hz to 65kHz is
impossible even with GNFB. 20dB of GNFB should reduce 3% of THD
to 0.3% at 0.0dB level and at
1/15 of full Po, output voltage, Vo will be reduced by 1/3.9, or
about 0.25 of full Vo.
THD will usually be found to be reduced in proportion to Vo, so
expect 0.075% at 1/15 of full Po.
An amp making 15W at 0.0dB clipping should achieve 0.075% THD at
1W, or less. Providing there
is no slewing of sine waves and THD does not exceed 1% between
30Hz and 20kHz at 0.0dB, there
will be no point to measure IMD and other artefacts, providing
also there is no HF or LF instability or
OPT saturation effects, regardless of whether a load is used or
if the load is a pure C or L of any value
which does not cause overloading. Most amplifiers should be able
to work with a pure C load = 1uF
at 20kHz or pure L load = 80mH at 20Hz, if the OPT output is
meant for 5 ohms. Most amplifiers will
not produce low THD at 1kHz and 0.0dB level if load = 100uF, or
0.1mH.
Intermodulation Distortion, IMD, measurement.
The harmonic distortion is of interest because it is a guide and
indicator of IMD which is worse
sounding than the THD by itself. There is some interesting
reading in the Radiotron Designer's
Handbook, 4th Edition, 1955. RDH4 says IMD for most tube amps
will be several times the value
of THD when tested as follows :-
1. The input test signal uses TWO Vac sine wave sources, each
with THD > 0.01%.
2. One is a LF sine wave of 80Hz, and is mixed with with a 5kHz
sine wave with 1/4 of the amplitude
of 80Hz.
3. When high levels of bass signal occur in any tube stage
within an amp, the Vac gain at high Iac
output wave peaks is more than gain at low Iac wave peaks. This
creates the 2H we see in every triode.
But where there is a small signal at 5kHz present, its amplitude
is slightly amplitude modulated, and
additional harmonic artefacts called upper and lower sidebands
occur. With 80Hz and 5kHz, the 2 added
F are 4,920 Hz and 5,080 Hz, and neither are harmoniously
related to the 5kHz. If the main THD product
was 3H as with a PP amp, there is a change of gain twice for
each crest of the wave, so the amplitude
of the HF wave is varied by 160 times a second, so products
exist at 4,840 Hz and 5160Hz.
4. Where music is played, the number of F present is countless.
The lower music notes modulated the
higher harmonics. If you could hear the Intermodulation
Products, IMD, on their own without the
non-distorted sound of music, it would be a dreadful cacophony
of noise, Tube amps which measure
much worse than their solid state cousins do manage to sound
better, so it seems the IMD from tubes is
different and less of a problem than
IMD from SS.
The test rig to determine IMD is :-
Fig 7.
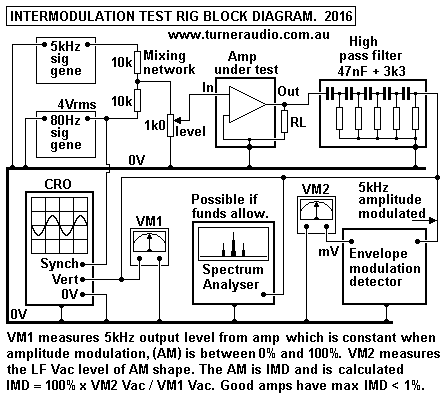
The high pass filter can be a simple cascaded CRCRCRCRCR type
with each section having a -3dB
pole at 1kHz. The series sections should allow a 5kHz signal to
pass without much attenuation but at
80Hz the attenuation will be over 100dB and the ultimate slope
of the filter will ensure rejection of the
80Hz signal or any other low frequencies such as mains related
hum signals.
The cathode ray oscilloscope wave forms will be :-
Fig 8.
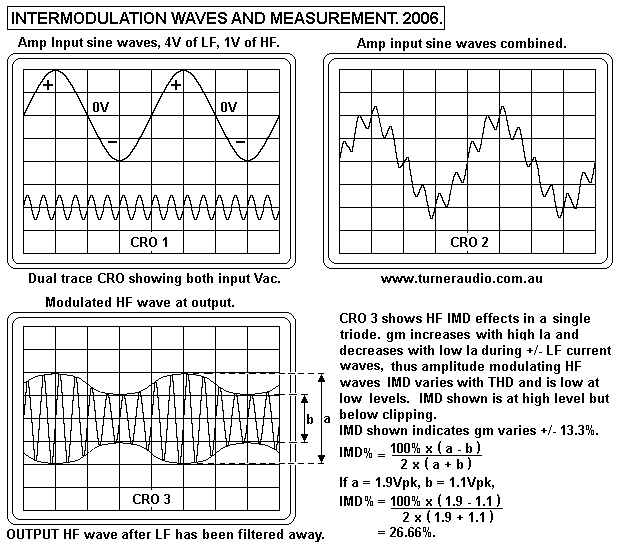
CRO 1 waves are LF and HF signals viewed separately on a dual
trace CRO with their amplitude
set so that the LF wave is 4 times the HF wave. With both
signals mixed together in the mixing
network the input to the amp under test looks like CRO 2 wave
form where the HF appears to be
"riding on" the larger amplitude LF signal. The HF in CRO 1 is
only 4 times the frequency of LF
wave, so if LF = 80Hz, HF would be 320Hz. But I have shown 320Hz
because its easier to draw
and understand; in practice, we would use 80Hz and 5kHz.
The Vo of amp at RL would have both 80Hz and 5kHz present and
appear similar to input
until clipping was approached where peaks of 5kHz begin to be
clipped first.
Before any clipping occurs, the CRO is useless at measuring IMD.
To be able to see IMD, the LF content must be filtered away by a
suitable HPF. The easiest is
C+R type with say 5 sections, each 47nF + 3k3 gives -22dB at
80Hz.
Without any LF present in output of HPF, we should only see 5kHz
wave plus any other harmonics
or noise at high enough F to get through the HPF. CRO 3 shows
the 5kHz, but amplitude modulated.
Spectral analysis will tell us three F are present, 5kHz
being largest amplitude, and two other
F at lower levels, 4,920Hz and 5,080Hz, and these are called
lower and upper sidebands. There may
be more than one pair of upper and lower sidebands depending on
the transfer curve for modulating
element. An SET produces mainly 2H and gives a simple spray of
IMD products. But where THD
includes many H products, there will be many more IMD products.
The CRO 3 just shows the the AM "envelope" shape of amplitude
modulation where the fundamental
5kHz plus two sidebands appear together to indicate just one F
but with varying amplitude. The CRO
does not tell us the sideband F.
Music always sounds best where IMD is kept low, and below 1% at
onset of clipping.
if the level of 5kHz was 5Vrms, then 1% IMD would mean the
envelope amplitude is 0.05Vrms,
and difficult to see on a CR0. But as soon as clipping occurs,
the IMD increases to make IMD easily
visible. To measure IMD at low levels the 5kHz should be fed to
a modulation detector circuit similar
to what is used for demodulating audio Vac from an AM modulated
radio "carrier" wave.
But in this case, the carrier is 5kHz, not say 455kHz in an AM
radio IF stage. The principle of detection
are the same; we want the detector to produce the peak level of
5kHz and to produce a Vac output
which follows the changes in amplitude of the 5kHz. With 5Vrms
of 5kHz input, It should be easy
to produce a modulation signal of only 0.05Vrms, 50mVrms.
Where IMD is found, the envelope shape change frequency will be
related to the frequency causing
the IMD.
Use of 80Hz and 5kHz is easy. But with say 1kHz and 1.7kHz, and
with equal amplitudes, the
sidebands are 2.7kHz, and these 4 F are close together.
Therefore a BPF with very high Q is required
to show each F and such gear can be them and use difficult for
DIYer to make, so a professionally made
spectral analyzer purchased at high cost or a PC program which
works with a sound card on a PC must
be used.
The test using 80Hz and 5kHz will show effects of having poorly
filtered B+ rails where there may be
100Hz present which changes Vac between OPT B+ and 0V. Between
the two points there is the OPT
primary load of say 4k0, and Ra of say 1k0, and a small amount
of hum causes Ia change in triode and
change of gm and hence modulation of all audio signals.
Following my PSU design methods avoids all
PSU related problems of injected noise to signal path.
Back to index.html
Back to education+diy.html


